Vim, Sublime Text, Visual Studio Code and the multiple cursors.
Article on comparative handling of multiple cursors in Sublime Text, Visual Studio Code and Vim.
- 1. Multiple cursors? Multi-cursors? What are we talking about?
- 2. Who “invented” multiple cursors?
- 3. Multiple cursors in Sublime Text 3 and 4.
- 4. Multiple cursors in Visual Studio Code.
- 5. Comparison of Sublime Text and Visual Studio Code.
- 6. Vim and the built-in multiple editing functions.
- 7. Effective multi cursors also on Vim.
1. Multiple cursors? Multi-cursors? What are we talking about?
What are multiple cursors?
An example is worth more than many words: imagine that you have a list consisting of a hundred lines and you have to insert a certain characters, for example a pair of asterisks, at the beginning and at the end of each term in the list.
Try performing the operation manually a hundred times and then measuring the time spent!
Now imagine, instead, entering those characters once for all the rows but using a hundred or so cursors simultaneously.
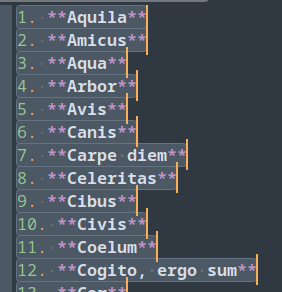
These are, notes, the multiple cursors.
Notice how the cursors are not aligned: this is because each individual cursor moves according to the length of the words. In other words: the sliders are independent of each other in terms of handling words and sentences.
2. Who “invented” multiple cursors?
Multiple cursors were first introduced in the text editor Sublime Text 2, released in 2011.
Those who used Sublime Text realized that using multiple cursors could save a tremendous amount of time.
Therefore, other text editors, such as. Visual Studio Code, Atom (an editor now abandoned, unfortunately), Vim (only by installing a plugin), Emacs (only by installing a plugin), UltraEdit, Gedit, have, subsequently, implemented similar functionality.
In this article I report some practical considerations on various operating systems, namely in Windows 10 (used “necessarily” for work) and various GNU/Linux distributions (especially Debian, Arch, Fedora and Ubuntu) on multiple cursors in Sublime Text 3/4, in Visual Studio Code and in Vim with some mention of the built-in functions in Vim that allow, but only under certain conditions, similar results.
Please note: I have not delved into the related topic of multiple selections (for example: Ctrl+d in Sublime Texte and Visual Studio Code, which would deserve a separate discussion.
Thus, you should not consider this article to be a comprehensive review on the subject of multiple cursors but only a description of the functions I actually use on the three editors indicated.
3. Multiple cursors in Sublime Text 3 and 4.
To pay tribute to the inventor of multiple cursors, the first analysis can only be devoted to Sublime Text.
The easiest way to add cursors is to hold down the Ctrl key and click with the left button of the mouse on the various places where cursors need to be added.
Another method is to hold down the Alt+Shift keys and use the arrow keys to extend multiple cursors below or above the initial point.
But the method that I find practically “perfect” is the Ctrl+Shift+l combination.
Basically it works like this: you have to select all the various paragraphs, without any length limitation, that you want to associate with multiple sliders; once you have finished the selection you press Ctrl+Shift+l to create the multiple sliders at the end of each paragraph.
After adding the various cursors just write or perform any operation, such as moving forward or backward, which will be extended in parallel to all points where the various cursors have been added.
In the case of paragraphs that go to the end of the line, you must press Home or End twice to send all cursors simultaneously to the actual origin or end of the lines.
To exit multiple cursors you either press Esc or click with the mouse, without holding down the Ctrl key anywhere in the document.
In this regard, I noticed that in Sublime Text 3 it is necessary to press the Esc key twice.
It is likely that this configuration is intended to prevent accidental exits from multiple mode or to separate undo and exit operations.
The system is really useful for quickly and simultaneously performing editing operations on virtually infinite numbers of paragraphs.
4. Multiple cursors in Visual Studio Code.
Handling multiple cursors in Visual Studio Code has a few minor differences from Sublime Text.
To add cursors with the mouse at different points in the document you press the Alt key instead of Ctrl.
To add cursors sequentially, the key combination is similar: Shift + Alt + Down↓/Up↑.
To add cursors to the end of each selected line, one can use the palette with the quick command F1 or the longer one Ctrl + Alt + P and look for the command Add Cursors to Line Ends.
The interesting fact about Visual Studio Code is that any command can be launched from the Command Palette, with no need to remember the various launch combinations.
The function of adding cursors to each paragraph end is also indicated in the Palette, with its launch combination: Shift + Alt + I.
The Visual Studio Code command palette is indeed comprehensive and useful for having everything at your fingertips without the need to memorize the various shortcuts.
In other words, Visual Studio Code allows you to free up the (human) memory and, therefore, to write while focusing on content.
5. Comparison of Sublime Text and Visual Studio Code.
Given the similarity between the two editors, at least as far as multiple cursors are concerned, I report a simple comparison table for three addition modes:
| Editor | With mouse | In sequence | End of paragraphs |
|---|---|---|---|
| Sublime Text | Ctrl + click |
Shift + Alt + Down↓/Up↑ |
Ctrl + Shift + L |
| Visual Studio Code | Alt + click |
Shift + Alt + Down↓/Up↑ |
Shift + Alt + I |
In both editors, to exit one must press Esc or click without pressing the Ctrl key anywhere in the document.
6. Vim and the built-in multiple editing functions.
Vim does not, natively, have multiple cursor handling functions similar to those of the newer editors seen above.
This, however, does not mean that Vim, even without plugin, cannot handle multiple rows simultaneously.
The built-in function to edit multiple rows at once is done through the visual block mode.
The combination Ctrl+v, sets up the editor to select several consecutive underlying rows using the j key.
When you reach the last line, you can use for all selected lines the movements, such as the w key to move to the next word.
However, the movements work, for all rows, based on the structure of the last row.
For example: you can add the prefix \item to each line with the following procedure:
Ctrl+v(Ctrl+qin Windows) to activate the selection of various rows,- Material selection of rows with the movement keys, e.g.
j. - Press
I(capitalize i), - Type the text
\itemwhich will be displayed only on the first line, - Press
Escobtaining the addition on all selected lines of the entered text.
The system works perfectly but under one essential condition: all selected text must be perfectly aligned.
If, therefore, a word in one row was longer or shorter than the words in parallel rows, the system would give an inconsistent result.
7. Effective multi cursors also on Vim.
Even on Vim it is, however, possible to get an effective multi cursor experience, very similar to that of the previous two editors.
For such a feature, the plugin vim-visual-multi must be installed.
With this plugin the shift commands automatically adjust to the actual length of the words in each line, similar to what happens in Sublime Text and in Visual Studio Code.
At this point you can create multiple sliders with the Ctrl + Down↓/Up↑ command.
Once the cursors have been created, you can immediately perform the usual operations in normal mode, e.g. dw, de, yw, or make the various moves with w, $, 0.
The following screen shot is the result of moving with 2w:

You can activate the extended mode, which corresponds to the multi-cursor extension of Vim’s typical visual mode, by pressing the Tab key.
You then activate writing in Insert Mode with i,a, I,A.
Specifically:
iactivates the insert mode at the locations of the various cursors,aactivates the insertion mode on characters later than those where the various sliders are located,Iactivates the insertion mode at the beginning of the lines,Aactivates the insertion mode at the end of the lines.
There are other commands besides the above.
The complete list can be found this point of the GitHub page of the plugin.
Thank you for your attention.